Making cheese at home is a craft whose time has come. With today's technology, communications and new attitudes about doing things creative, it is about where homebrewing was twenty years ago, viz., about to explode.
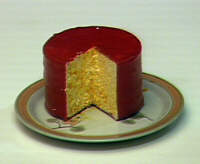
The cheese in the photo was my first attempt and the best cheese I ever tasted. While it's easy to forget what great cheeses taste like and easy to glorify one's own efforts, the point is, making cheese at home is just another of life's learning processes.
While not a slapdash project nor immune to disasters, simple cheeses are no more difficult to make than bread. Cottage cheese can be made with equipment and raw materials found in any kitchen. More advanced cheeses require some additional equipment and raw materials but it can all be learned by anyone willing to make the effort. I would put it at about the same level of complexity as making beer or wine at home.
BARE BONES
The following recipe represents the ultimate in simplicity in cheese making. It will produce a delicious cottage cheese that resembles ricotta and is excellent fresh or used in cooking Italian dishes such as lasagna. We recommend that beginners start with a cottage cheese to get the feel for the basics and for the instant gratification of being able to enjoy the product immediately.
Ingredients:
1 gallon 2% milk
1/2 cup vinegar
1 tsp salt
1/2 cup vinegar
1 tsp salt
1. Heat the milk to 190F. You will need a thermometer for other cheeses but you can get by here turning off the heat just before the milk begins to boil.
2. Add the vinegar and allow the mixture to cool.
3. When cool, pour the mixture, (which now consists of curds and whey as in Miss Muffet food) into a colander and drain off the whey.
4. Pour the curds into a bowl and sprinkle on the salt and mix well. You may wish to use less salt or more. It is simply a matter of taste which is the next step. You can add a little cream for a silky texture.
We have also made small curd cottage cheese because we left out another ingredient called rennet. This is an enzyme the produces a harder curd. It was originally made from calf stomachs but is now synthesized and available in liquid or tablet form. I believe the cottage cheese sold in supermarkets as large and small curd is a fiction because the ingredients on the label for the two products are exactly the same. More on rennet later.
Because both the bacteria and rennet can be destroyed by temperature, the traditional process requires several ripening steps at lower temperatures and a curd cooking step at a higher temperature. Because vinegar is inactive, we went immediately to the cooking stage and saved a lot of time.
Finally, the difference between soft cheese and hard cheese is that the latter requires pressing the drained curds in a cheese press, drying the pressed cheese and then aging for several months.
The most important ingredient in cheese, is of course, the milk. Cheese can be made from just about any kind of milk including, cow, goat, sheep, mare and camels. It is the lucky home cheesemaker who even has access to fresh cow's milk, let alone the other exotic types. We will presume that the cheesemaker is limited to what can be purchased in the local supermarket. If fresh milk is available, consider yourself lucky and proceed in the same manner.
There are two characteristics of commercial milk that conspire to make life difficult for the cheesemaker. First of all, it is Pasteurized and the native flora and fauna are killed. This is not necessarily bad but simply puts a limit on the ultimate flavor potential of the cheese. However, this limit we can live with and as mentioned elsewhere, is a good compromise in favor of safety.
The really serious problem with store milk is that it is homogenized. This is a process that breaks up the fat globules to such a small size that they are forever in suspension and never again separate as in fresh milk. The bad news is that it does something else to the fat that interferes with making good quality cheese. The effect is to produce a wax-like texture that sticks to the teeth and hinders flavor development. The fix is to use the lowest fat milk available and replace the needed fat with whipping cream. Although the whipping cream is also homogenized, the fat to casein ratio seems to prevent the fat from producing the texture defect.
I have experimented with various milks and have actually achieved the best results using powdered skim milk combined with whipping cream. Following the directions on the box and adding 1 pint cream per gallon of milk produces a cheese as good or better than by using fresh whole milk. All the procedures which follow can and should be made using this milk. The only cheese that seems to actually perform better with homo milk is Stilton.
Starter is to cheese what yeast is to wine and beer. It is a living colony of microscopic organisms that give the cheese its characteristic flavor. One basic difference is that yeast is a fungus and cheese starter is usually a bacterium. However, that's not to say that fungi have no place in cheese. The blue stuff in blue cheese, for example, is a fungus.
Fresh whole milk contains the necessary bacteria to produce cheese but for several reasons, it is best to use a prepared starter and not trust to chance. Fresh milk contains lots of other flora and fauna that may or may not be useful to cheese making or even dangerous to life. It is best practice to Pasturize the milk to kill everything and inoculate it with a known culture of the proper organism. When using supermarket milk, we have no choice as it will have been Pasteurized.
Wine makers are in exactly the same position. Every grape comes with the natural yeast to produce the natural wine but rather than risk a batch to whatever else might be lurking on the grape, the must is treated to inhibit all natural organisms and is then inoculated with a yeast culture. Not doing this is precisely why home made wine has such a bad reputation. It's either great or undrinkable.
Many recipes and books suggest using cultured buttermilk as a starter and if one is anxious to get started, it is readily available. However, one can never be sure just what the culture is and a real cheese starter is more likely to produce high quality cheese.
The entry level cheeser should purchase what is known as a mesophilic starter from any supplier of cheese making supplies. A search of the web will provide several sources. This comes as a dried powder in a small packet like yeast. The most convenient form is what is known as DVI or Direct Vat Innoculation. This is added directly to the milk and no pre-culturing is required.
SANITATION
I must digress here to a subject of utmost importance to the making of any fermented product. Simply put, sanitation is everything. From the end of Pasteurization till eating, nothing should be allowed to contact the cheese that has not been properly sanitized. Beginners should take this advice to the extreme and old time fermenters know what corners can be cut. Anything that can, should have water boiled in it or vice versa. If it can't be boiled, it should be soaked in a bleach solution of about 1 oz per gal of water. This stuff must be rinsed ad nauseam to get rid of the bleach so the advantage of stainless is manifest. Tools and other small stainless items can be simply passed through the flame of a stove.
BACK TO THE STARTER
If you choose to use a culturable starter, use the following procedure. If you use DVI culture, you can skip this section.
Prepare the starter as follows:
Boil half a cup of water in a covered saucepan for about 5 minutes to sanitize it. Pour out the water and pour in 2 cups of any kind of milk. Bring this to near boil and turn off the heat. It is now Pasteurized, the quick way. When the bottom of the pan is cool to the touch (room temp) add the starter from the packet and stir with a sanitized spoon. Stir again in a few hours and set aside for about 24 hours or until the mixture has the consistency of very soft yogurt. At this point, stir again with sanitized spoon and pour into a sanitized ice cube tray and freeze. As soon as it is frozen, put the cubes into a sanitized zip lock bag and store in the freezer.
The day before you plan to make cheese, drop a cube into a cup of milk prepared the same as above and the next day you will have a cup of starter ready for your recipe. The amount required is usually specified in the recipe but it is always less than a cup.
RENNET
The next item needed for serious cheese is an enzyme called rennet and not much more needs to be said about it other than how it is prepared. It is available from the same suppliers as the starter. The tablet form seems to be the beginner's choice but the liquid is much simpler to use. To prepare the tablet form, dissolve the specified amount in sterile water about an hour before it is needed. I bring a 1/4 cup water to a boil in a Pyrex measuring cup in the microwave and let it cool to room temp. Then I drop in the tablet and let it dissolve. I help it along with a sanitized spoon. This is poured into the cheese at the appropriate time. The liquid form is simply measured out according to the recipe. One tablet is equivalent to two tsp of the liquid form.
1/2 renet tablet
1/4 cup prepared mesophylic starter
Pasturize milk for 30 min at 143F
Cool to 86F
Add 1/4 cup of prepared mesophylic starter
Ripen for 60 min at 86F
Add 1/2 rennet tab disolved in 1/4 cup water, stir for one min then cover.
Hold at 86F for 60 min
The purpose of cutting the curd is to begin the water/whey removal process by increasing the surface area of the curds. Under controlled conditions, it also determines how much acid is produced by controlling the amount of lactose that is allowed to convert to acid.
The byword here and in all further stirring and handling of the curd is gentle. Rough treatment will destroy the adhesion of the curds and produce a mess.
After cutting the curd:
Heat very slowly to 102F, stirring gently to distribute the heat
Hold at 102F for one hour, stirring occasionally to keep the curds separated
Pour into cheesecloth lined collinder and drain for about 30 minutes
Return matted curds to kettle and break into bite-sized pieces
Sprinkle on 1 3/4 tbs of salt and mix thoroughly
Place in shallow bowl lined with paper towell and air dry for a day or two,
stiring occasionally and replacing the paper towell as necessary.
We have just made "CHEESE CURDS" which can be eaten at any time and will keep for about two weeks in the refridgerator.
If you would like to go on and make a hard cheese (press required),
continue as follows:
Pour curds into cheesecloth lined mold and fold excess cheese cloth over the top of
the cheese and add the follower. Start pressing at about 10 lbs for 30 min, increase to
30 for about 60 min. Flip the cheese/mold and press at 30 for another 60 min.
Remove the cheese from the press and carefully remove the cheese cloth.
Next we "dress" the cheese with a cheese cloth bandage of one circumference plus a
bit of overlap. The width of the bandage is about 3 inches wider than the height of the cheese.
This is wrapped around the cheese and the edges neatly folded over the top and bottom.
Return the bandaged cheese to the press and press at 50 lbs for 16 hrs. The cheese should be
flipped several times over this period to even out the pressing.
Remove from press, carefully peel off cheesecloth and air dry for several days
until it is dry to the touch and a rind has formed.
Wax and age at 55F for a min of 30 days.
For additional cheese RECIPES